MMMmmmm Food!

MMMmmmm Food!

Sunday, February 27, 2011

Oatmeal Dark Chocolate Chip Walnut Cookies

We've been long overdue for some more sweet things on this blog!
While doing our morning yoga on the terrace...  (Taz loves doing sun salutations)...  He came up with the idea to surprise Daddy John and the cast of Things To Ruin: The Songs of Joe Iconis with some delicious cookies!  It's like our very own episode of The Barefoot Contessa - except we aren't cooking for Mel Brooks and Susan Stroman - but John, Joe & friends are even better!

Check out this video - one of the songs from Thing To Ruin!  

4 Shows Only!!!  @ Le Poisson Rouge 

February 28th : Doors 9:30/Show: 10:00pm
March 7th: Doors 6:30pm/Show 7:30pm

March 20th: Doors 10pm/Show 10:30pm
March 28th: Doors 10pm/Show 10:30pm

$20


Ingredients:

1 & 1/2 cups packed light brown sugar
1 cup butter (2 sticks)
1 egg
1 tsp vanilla extract
1 & 1/2 cups flour
2 cups oats
1 tsp baking soda
1/4 tsp kosher salt
1/2 cup dark chocolate chunks
1/2 cup semi-sweet chocolate chips
1 cup chopped walnuts

Preheat oven to 350


Mix together the butter and brown sugar until it looks creamy - Hand mixer works really well!  And a glass of wine to drink while you mix...


Add the vanilla and egg - continue mixing until those are just a bit fluffy. 

Now add the other dry ingredients and mix those in by hand.
Roughly chop up the walnuts and add them with both types of chocolate chunks/chips.
Once the cookie batter is all ready, use a large table spoon to make rounds of dough a little bigger than a golf ball.  Keep them about 2 inches away from each other.

Taz:  "Are they ready yet Daddy???  I can't wait to surprise Daddy John and Joe!  Why do we have to wait 12-14 minutes?!"

Daddy Matt:  "Well Tazzy, we have to wait that long because we want to cookies to be fully cooked, but still a little chewy!  I'm sure they will love them!"


I'm sad that I forgot to get a picture of everyone eating these after rehearsal!!!  I guess I will just have to think of something else to make sometime soon for all of them..... hmmm.....

Friday, February 25, 2011

Buffalo Chicken Empanadas!

What a great party dish!  They're cute and mini too!
Tazzy says, "UMMM... excuse me please Daddy...  I thought I was the cute, mini-sized bundle of joy in this apartment!"

Nothing can compare to my little Tazzybear!
 The key here is frozen puff pastry!  One box comes with two sheets.  
Let them thaw for about 40 minutes.
 Other supplies to have:

1 large boneless chicken breast
2 boneless chicken thighs
6-7 chopped scallions
1/2 chopped celery + the leaves
1/4 cup Frank's Red Hot
1 tbsp butter
Salt & Pepper
1 egg

 Chop up the celery and the leaves - also chop the scallions.  Boil the chicken breast in a pot of water until it reaches 160-165 degrees (around 10 minutes).
 Season the chicken thighs with a little grapeseed oil spray, salt and pepper.  Brown them in a frying pan until fully cooked.  Then chop up the breast and thigh meat.
 Add the chopped celery to the pan and add butter - cook for about two minutes.  Next, add the chopped chicken, scallions and hot sauce.
On a floured surface, roll out one of the puff pastry sheets to around 14 by 14 inches.  Then cut four lines left/right and four lines top/bottom... now you have 16 little squares.  Start your oven to preheat to 375 now.
 Place some of the buffalo chicken filling on each square.  Then top with a small crumble of blue cheese.  Beat an egg and brush two sides of each square (you want to make a 90 degree angle with the egg wash).  Then pull the puff pastry over the filling to seal it.  Use a fork to crimp the dough together.
 Use parchment paper on a baking sheet for easy cleanup and so that they are easily removed!  Brush the tops with more egg and crack some black pepper on each one.  This will help them get golden brown.
Yum!  Look at these delicious, little packages of spice!!!  You will love them - for extra heat, make some buffalo wing sauce to dip them in.  (Buffalo wing sauce can be seen in the very first blog recipe for buffalo chicken meatballs!)

BBQ Bacon Wrapped Shrimp!

I do declare, dinner is taking a trip to the deep south tonight - 
the land of Paula Dean, Nene Leakes and Scarlett O'Hara!

SHRIMP 'N GRITS!

 Taz:  "But Daddy...  You're a Yankee boy from Connecticut.  What do you know about making grits?"

Matt: "Well Taz...  I don't know anything about making grits!  And that's why this blog post is titled BBQ Bacon Shrimp!  And because my grits probably didn't come out the way they should have!  HA!"
 (As you can see above... there are many more items besides shrimp and bacon - ignore them)

Maybe we will make grits some other day after some more practice!  Think of this more like a great cocktail party appetizer.

You will need:

1 pound large size shrimp (18 shrimp)
9 slices of bacon
BBQ sauce (recommend Jack Daniel's original no. 7)
bamboo skewers 

Preheat oven to 350
*Soak the skewers in water for at least 30 min.

 Cleaning shrimp...

I like the shrimp you have to work for.  They're a little cheaper, dirtier, and that's just the way I like things.  Wait, what?  

Run a sharp knife down the front side (where the legs are) of the shrimp.  This lets the shell peel off easily!  Then run the knife down the back side (the shrimp on the left above).  This will expose the vein of the shrimp.  Yikes - what has that one been eating? You really need to take it out!  Let's say you don't - that is why people have to pack up their knives and go on Top Chef!  Just take out the poop and everyone will win.
 Look at these happy, clean fellas!
 Rather than wrapping raw bacon around the shrimp, cook each slice a little first.  Don't let it get brown, but just take some of the fat out.  One slice is good for two shrimp.  Cut it in half and brush some BBQ sauce on it.  Then wrap it around the shrimp and secure with the skewer.
 I fit three shrimp on each skewer.  Place a rack on a baking sheet.  
 Brush on a little more BBQ sauce!

With the oven nice and hot at 350, change the setting to broil and temperature to 550.  I let mine stay under the broiler for 3 minutes on one side and 3 on the other.
 I should have put all the shrimp on a platter with cocktail toothpicks in them.  The BBQ sauce has a wonderful, sweet, tang while the bacon is smokey and savory!  YUM
 But if you were to have an amazing recipe for cheesy grits on hand... and know how to make grits... maybe you can make a plate that looks like this!!!  

Blast!  ...Until another day cheesy grits.....  

Thursday, February 24, 2011

Mini Deep Dish Cheese Pizza!

For those times when you need some pizza from Uno's - but you don't want to go there and get it!
 Taz sayz:  I CAN HAZ PIZZA TONIGHTS 2!?!?!
 

The items you'll need:

4 mini springform pans (recommend kaiser brand)
1 ball of pizza dough
1 - 14 oz. can diced san marzano tomatoes
1 tsp dried oregano
1 clove of garlic
1 jar san marzano tomato basil sauce
a few tbsp butter
salt & pepper
package of shredded mozzarella
chunk of parmesan

"Matt, oh my gosh!  You make your own pizza dough too!?"
  ...Are you kidding me?  It was a Wednesday night after a long day at work - hell no.  Here's what you do:  go to your local pizzeria and ask them for a ball of pizza dough.  Super easy - it was three bucks - and I saved myself hours.  Done! 
Cut the dough into 4 equal pieces.  Rub a little olive oil on each "mini ball."  Set that aside to rest for a few while you make the sauce...
In a medium sized pot, simmer the diced tomatoes with the oregano, crushed garlic and some salt and pepper.  After about 10 minutes, strain out some of the watery liquid.  You only want the chunks.  Then I added about 1/2 the jar of tomato basil sauce to give it a little more of a base.  I love that chunky tomato sauce at Uno's!  Keep that on a low simmer while you prep each springform...
Butter each pan - bottom and sides.  This will help the pizza pop right out and help give the crust a buttery flavor!!  Preheat oven to 475!
Now it's time to "pan" the pizza dough!  It should be puffy - there is a lot of air in the dough.  Put the dough quarters in each pan - press down with your fingers so that the dough is on the bottom and comes up the sides.  It takes a little while to work some of the air out and keep the dough up the sides - if you don't press it enough, the sides will want to join the bottom. 
MMMmmm cheese...  such an evil force in the food world. 
 _________  is to Matt as kryptonite is to superman.   Answer: Cheese
OK - put a good amount of mozzarella on each pan of dough.  You want to put more in there than you think... so just load it up!  Then spoon on the chunks of tomato/sauce.  You really want to have more chunks than sauce here.
Using a microplane, grate some of the parmesan on each pan pizza.  Melt a little bit of butter and brush each crust with it - this will help it get golden brown and Paula Deen was on TV - so why not???

Bake for about 10 minutes at 475, then lower temperature to 350 for another 12-15 minutes.
Hopefully, you get something that looks like these!!!  Some more parmesan on top is great too! 
Also - if you want any other toppings on the pizza, just put it on top of the cheese - then tomato chunks on the toppings.

Enjoy!  (an attempt at Uno's pizza... but nothing is like the original!)

Wednesday, February 23, 2011

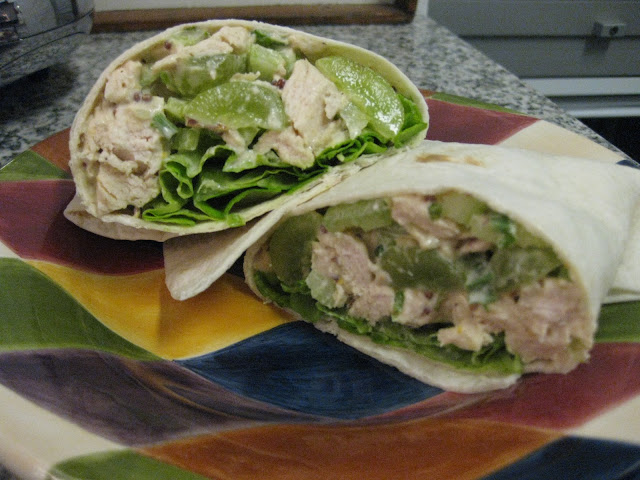
Chicken Salad Wrap!

What's for lunch today...?

I've been craving this for awhile now.  When I was in high school, my part-time job was at a small patisserie that made the only chicken salad I've ever liked.  

I hate when you see the chicken salad in a deli - it usually looks more like tuna fish or something so ground up it takes an ice cream scoop to plate it.  Yuck.  This is a much more chunky, lightly "dressed" salad.

TAZ IS A MONSTER WITH HIS MONKEY TOY!!!!!!!


Let's talk about what you need:
(Makes about 4 wraps with a little extra - for the cook!)

Chicken Breast (3 piece package)
1 cup chopped celery (inside of stalk for boiling)
1 onion (for boiling)
1 cup grapes (cut in half)
1/3 cup chopped scallions
1/3 cup roasted sliced almonds
Salt & Pepper to taste
1/3 cup mayonnaise
1 tbsp dijon
2 tbsp whole grain mustard
boston/bibb lettuce
flour tortilla

First, boil your chicken in a pot with some celery hearts/leaves and an onion (this is just for extra flavor). Put enough cold water in the pot to just cover the chicken and vegetables.  Grind some black pepper also.  For fully cooked chicken, make sure it is at least 160 degrees inside.  I think mine took 8-10 minutes.  While that is boiling, prep everything else...
Chop up the celery, scallions and cut the grapes in half (as seen above).  Those three items can wait in one bowl.

Mix up the mayo, and two mustards in a different, small bowl - if the chicken isn't done yet, keep the "dressing" and bowl of "greens" cold in the refrigerator.
I wanted to make this and eat it right away - so if you are going to do that too... let the chicken cool on some ice.  You don't want warm chicken salad - ew - Once it is cool enough, chop it up into small chunks.
Put the chicken and "greens" into a bigger bowl.  Spoon in the mayo/mustard - I used most of this mixture, but didn't want it too full of mayo.  Put in as much as you want.  It's better to spoon it in a little at a time - you can't take it out if you put too much in!
Finally, add in the almonds and season with salt and pepper to taste.

You could stop here and just eat the chicken salad in a small bowl - Yum!  But why stop there?  We can make a wrap!
Microwave a flour tortilla for 12 seconds.  This will make it easy to fold up.  (MMMmmm think of a Chipotle burrito when they "flash warm" it!  We'll fold ours the same way too!)  Put some of the chicken salad in the middle.
Then lay a few leaves of the boston/bibb lettuce on the chicken.
Fold the side closest to you over the lettuce, then bring in each side, then roll the whole thing onto the far side.  You should hopefully get something that looks like this!  Cut it in half and plate with anything you'd like!
All that wrestling with monkey toy sure wore Tazzy out!!!  Now Daddy can eat in peace!!!

Tip - this is almost better the next day!  Let all those flavors come together.  You could make this some evening and then have it for lunch the next day!